


These days, opening multiple tabs or windows on your device has become necessary if you want to complete various tasks. Whether it’s a school assignment, a work project, or even a vacation itinerary, navigating between them can be frustrating.
This is where splitting your screen can work wonders. You can watch an educational video while you work on a school assignment or have a spreadsheet easily accessible when writing a report.
macOS has a Split Screen feature, so you can keep an eye on multiple windows without switching or pressing Command + Tab every time. It is available on devices with macOS Mojave 10.14 and higher.
What Is Split Screen?
Splitting your screen allows you to run two applications at the same time. You can work more efficiently and access all the necessary information without repeatedly toggling between screens.
In newer macOS versions, the split-screen mode is called Split View.
Benefits of Using Split Screen
Here are some benefits of using a split screen or Split View on macOS:
Saves Time
Navigating between multiple windows can be annoying and time-consuming. With Split View, there’s no need to waste precious seconds toggling between different apps.
Increases Productivity
When you have everything you need in front of you, working on tasks is much more efficient. You don’t need to pause or recalibrate your mindset every time you switch apps.
Allows Seamless Multitasking
There are many schools of thought when it comes to multitasking. But if you’re all for it, Split View can help you do many things at once.
Prerequisites for Split Screen on Mac
The Split View feature was introduced in 2015 with the release of OS X El Capitan 10.11. Since then, all macOS releases have supported Split View:
- macOS Sonoma 14
- macOS Ventura 13
- macOS Monterey 12
- macOS Big Sur 11.0
- macOS Catalina 10.15
- macOS Mojave 10.14
If you run one of these macOS versions but Split View doesn’t work, it could be because the applications are not compatible. When you choose an app and move it to the second half of the screen, the full window should become visible immediately. If this doesn’t happen, there may be compatibility issues.
It could also mean that you're not in full-screen—split screen only works when both apps are in this mode.
How To Split Screen on Mac: A Step-by-Step Guide
With Split View, you can work on two windows side by side at the same time. This will save time, increase productivity, and help you multitask. Naturally, it’s an excellent option for school assignments, work projects, and even hobbies.
Follow this step-by-step guide to initiate and make the most of this feature on your macOS device:
Step 1: Accessing Split Screen Mode
This can be done through Mission Control or the Full-Screen button. If you are already using an app in full screen but want to switch to Split View, simply do the following:
- Press Control + Arrow Up to launch Mission Control.
- Drag one of the windows from Mission Control onto the thumbnail of the full-screen app in the Spaces bar at the top of the screen.
- Click the Split View thumbnail.
- You can also drag an app thumbnail onto another in the Spaces bar.
If you wish to use Split View on other displays, go to System Preferences, then Mission Control. Click on Displays have separate Spaces to turn it on.
If you’re not in full-screen mode, follow these steps:
Step 2: Choosing the First Window
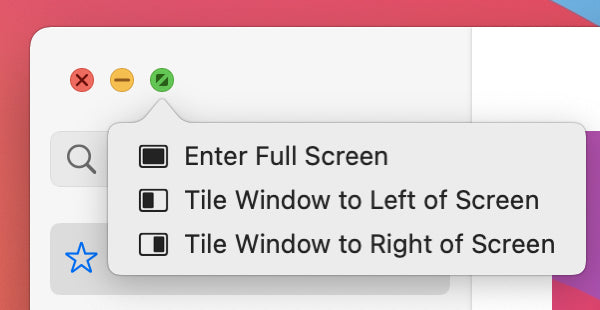
- Choose one of the applications that you wish to have on your split screen.
- Hover over the green button on the top-left corner of the window. You’ll see multiple options: Enter Full Screen, Tile Window to Left of Screen, or Tile Window to Right of Screen.
- Choose the right or left to place the window on the appropriate side. You can make any adjustments, like resizing or moving the window on the other side of the screen.
Step 3: Selecting the Second Window
- Once the screen has split, choose the second application you want on your screen.
- Adjust the screen as needed for your convenience. Drag the cursor to resize each window.
If your desktop is cluttered, you can use Mission Control to create additional desktops or Spaces to work in.
Managing Windows in Split Screen
While having a split screen makes life easier, making the most of it takes some practice.
How to Resize Split Windows?
Do you want one application window to appear larger than the other? Click on the divider line to adjust your screen allocation and drag it left or right to change it.
That said, not all applications are adjustable. For example, the Apple Photos and Apple Music apps can only be set to a specific size.
If you want to switch the applications around, go to the upper toolbar to drag one window to the other side.
How to Switch Main Window in Split View?
To split the screen from the main window, press Control + Arrow Up. This will lead you to Mission Control, showing you all your open applications. You can click the app in the Spaces bar and choose another window to split the screen.
How to Exit Split-Screen Mode?
When you’re done using Split View, click on the green dot on either app to return to normal view.
You can also press the Esc key to return to your original desktop configuration.
If you cannot find your window, don’t panic. Simply press the Mission Control button (F3), and you should see two options: the desktop and the windows in split-screen mode. Click the other window and the green dot to exit.
Troubleshooting Common Split Screen Issues
It's common for technology to fail you when you need it the most. Knowing what you need to do in times of trouble can help you stay productive and efficient.
Here are some common troubleshooting solutions when in Split View mode:
What To Do if a Window Doesn’t Support Split Screen?
Some applications do not support the Split Screen or View option on macOS. If you find an app like this, don’t worry. When you try to split your screen, but the application isn’t compatible, you’ll see a message that says, “Not Available in This Split View.”
When this happens, click the Apple button and go to System Preferences. Click Mission Control and select “Displays have separate Spaces.” This will help you use Split View.
How To Handle Unresponsive Apps in Split Screen?
You can shut down apps in Split View just like you would in regular viewing mode. If a window becomes unresponsive, press Esc, select the app on the list, and then click Force Quit.
You can also force quit the application by right-clicking its icon in the dock and selecting Force Quit, which should close it. After you quit the application, you can open it and try again.
Tips for When You Can’t Exit Split Screen Mode
If you find yourself stuck in Split Screen Mode, here’s how you can get out of it:
Use the Keyboard Shortcut
Press and hold the Control key, then press the Arrow Up key. These commands will bring up the Mission Control, allowing you to exit the split screen.
Check your System Preferences
Go to the Apple menu, then click System Preferences and Mission Control. Make sure that the box next to “Displays have Separate Spaces” is checked.
If it has already been checked, switch it off and on a few times to resolve the issue.
Disable Split Screen Entirely
If nothing else works, disable Split View entirely. Again, click the Apple menu at the top left of the screen, then go to System Preferences and Mission Control. Then, uncheck the box next to "Displays have separate Spaces." This will disable Split View, so you can use your device in full-screen or normal mode.
Advanced Tips and Tricks
Here are some keyboard shortcuts that you can use to streamline your workflow:
Keyboard Shortcuts for Efficiency
- Enter/Exit Split View- Use Ctrl + Command + F to enter and exit full-screen mode.
- Switch Between Apps- Click Command + Tab to quickly switch between applications.
- Mission Control - Access Mission Control with Control + Arrow Up to easily manage your various windows and desktops.
- Show Desktop- Press F11 or Command + F3 to quickly view your desktop and drag files into your split-screen apps.
- Force Quit- To exit an unresponsive application, press Command + Option + Esc to Force Quit.
Working With Multiple Desktops With Split View
You can create additional desktops and split each of those screens, too. Simply access Mission Control (F3 or Control + Arrow Up) and click the + button on the rightmost edge of the Spaces bar at the top of the screen. macOS can accommodate 16 spaces.
Alternatives to Split Screen
If macOS Split View is not the best solution for your workflow, you can opt to manually extend your screen instead.
Use Extended Screen

Extending your screen via a portable monitor will take your productivity to another level. Cutting-edge tools like Duex Max provide an exponentially larger screen space to accommodate even more windows and applications.
Final Thoughts

A split or extended screen boosts productivity, saves time, and is a more efficient way to work. If macOS Split View isn’t enough for your workflow, Duex Float is a portable stacked monitor that’s a worthy addition to your setup.
Check out Mobile Pixels for other top-notch tech solutions for efficiency.
Discover Tech Gadgets


Leave a comment
All comments are moderated before being published.
This site is protected by hCaptcha and the hCaptcha Privacy Policy and Terms of Service apply.